Install Dash Enterprise on a Virtual Machine - Airgapped
This guide can help you if you are a new Dash Enterprise customer looking to start with a Dash Enterprise 5 installation, or if you are upgrading from Dash Enterprise 4.X.
About Dash Enterprise: Use Cases
Dash Enterprise puts data and AI into action with the creation of production-grade data apps for your business. Python is the premier language of AI and data and Dash Enterprise is the leading vehicle for delivering Python-based, interactive insights and analytics to business users.
- Dynamic: Build sophisticated interactivity into your data apps, write back data, and create beautiful, shareable insights.
- Flexible: Customize every pixel of your data app easily, without a line of front end code. Focus on Python analytics without compromising app look-and-feel or branding.
- Production-grade: Enjoy advanced security features for data insights at scale. Reduce IT dependence with one-click deployment, automated CI/CD, embeddable data apps, and more.
Cost Model and Billable Services
Dash Enterprise pricing is based on the number of instances, number of license seats, and server capacity that your organization requires.
Exact pricing is established via private offer. There are no optional features.
Plotly also offers paid Professional Services hours where app developers can
receive direct assistance to develop data apps that meet their users’ needs.
These hours are negotiated and billed separately from Dash Enterprise.
About the Installation
Installing Dash Enterprise is an automated process: You’ll run a script on the VM that creates a Kubernetes cluster using kURL and installs Dash Enterprise on it. You’ll need an internet connection to obtain required files such as the script itself, but the script does not require internet access while it runs.
This guide describes how to use your cloud provider’s virtual machine (VM) service to provision a VM that will act as the server, but you can still follow this guide if you already have a VM ready to go.
You’ll be installing Dash Enterprise as the single tenant on the cluster—that is, no other software is installed on the cluster (except mandatory supporting software). Single-tenancy is well-suited for Dash Enterprise because it is a complex platform, organizing resources on the fly when developers perform tasks like deploying Dash apps and creating databases. Multi-tenancy is not currently supported.
Plotly uses Replicated to package and deliver Dash Enterprise. You’ll be interacting with the KOTS Admin Console, part of the Replicated toolset, in the configuration step of this installation. After the installation, you’ll continue to use the KOTS Admin Console for system administration such as performing Dash Enterprise upgrades.
Before You Install
Here are some important notices and details about supported configurations before you get started.
- Fetching Python package dependencies: In order for Dash app developers to use an airgapped Dash Enterprise instance, their apps need to fetch Python package dependencies from an internal index. (If there is no internal index available, developers need to place Python packages individually in their app’s files, which is not recommended for apps that require many packages because it involves additionally managing those packages’ dependencies).
Before committing to an airgapped Dash Enterprise installation, make sure your organization can provide an internal index. Dash Enterprise requires that the index have a TLS/SSL certificate from a globally trusted certificate authority (CA). A common strategy is to create a mirror of pypi.org.
Important: Apps deployed to a newly installed instance of Dash Enterprise use Python 3.12 by default, though developers can change the Python version. For a full list of supported Python versions for pip-based apps, see Supported Python Versions.
Similarly, if Dash app developers plan to deploy apps that depend on APT packages, you’ll need to prepare a custom APT repository with a TLS/SSL certificate from a globally trusted certificate authority (CA).
-
Changing the VM IP: Changing the internal and/or public IP of the VM after installation, such as by moving the VM to a different subnet, is not supported.
-
Load balancing: Dash Enterprise on a single server does not come with a load balancer. If you need to place a load balancer in front of the VM, make sure that it supports websocket connections. If the load balancer is an AWS Network Load Balancer (NLB), the “Preserve IP client address” option must be disabled so that NAT loopback requests can be made.
Prerequisites
Preparing Your Installation
Contact our Customer Success team to get started. We’ll ask you:
- The base domain you want for your Dash Enterprise instance. It must be a fully qualified domain name (FQDN).
- Whether your environment has any requirements (if your environment requires advanced configuration, an additional Support and Services Engagement may be required).
- Whether you want to retrieve the Dash Enterprise images (and third-party images) in your private container registry before the installation (for instance, to perform a security scan).
Obtaining Your Installation Plan
When we have this information, we’ll send you a tailor-made installation script as well as a link and password to a download portal from which you’ll need to download an airgap bundle. Your Installation Plan is tailor-made based on your conversation with Customer Success and contains everything you need to install Dash Enterprise for your organization.
Your Installation Plan contains:
- Your installation script,
install_de_ss_airgap.sh, which creates the Kubernetes cluster and installs Dash Enterprise as well as supporting software. - Your config file,
config.local.sh, which contains variables used by the installation script. You’ll define some of these variables as part of the install preparation. - A package of preinstalled tools,
setup-tools.tar.gz, which contains kURL as well as other tools required for the installation. - Your Dash Enterprise license file.
- A script for entering the bootstrap pod,
enter_bootstrap_pod.sh, which is intended for post-install operations. The bootstrap pod is where key tools will be located after the installation. - A checksum file,
sha256sums.txt, provided for support purposes.
Downloading Your Airgap Bundle
In this step, you’ll download the airgap bundle required to install Dash Enterprise. Note that the Dash Enterprise airgap bundle is approximately 21 GB.
To download the airgap bundle:
- On your workstation, use the link and password provided by our Customer Success team to go to the download portal.
- In the left sidebar, make sure that Bring my own Kubernetes (Existing cluster installation) is selected.
<img>
- Under Dash Enterprise App Bundle, select Download airgap bundle. You’ll use this bundle in a later step.
Provisioning Your Server
Defining Variables in the Script
Unzip your Installation Plan and open the config file. Edit the following variable values:
ADMIN_PASSWORD: The password you want to set for the KOTS Admin Console.
About storing and resetting this password: We recommend storing this password in your organization’s password manager, and giving access to any other members of your team who will be managing the Dash Enterprise system (notably performing upgrades and obtaining support bundles). This password is not retrievable with a
kubectlcommand. It can be changed in the Admin Console UI by anyone who is able to log in with the current password. If lost, reset it by runningbash enter_bootstrap_pod.shon your server and thenkubectl kots reset-password -n plotly-system.
HOST_INTERNAL_REGISTRY: The hostname of the private container registry you are using for Dash Enterprise images, including the desired namespace. Must not include a trailing slash.HOST_INTERNAL_REGISTRY_USER: The username for the account you’ll use to push images to your private container registry.HOST_INTERNAL_REGISTRY_PASSWORD: The password for the account you’ll use to push images to your private container registry.AUTH_REGISTRY_PULLS: Leavefalseif the private container registry does not require authentication to pull images. If authentication is required to pull images, change totrue.HOST_INTERNAL_REGISTRY_BASE: IfAUTH_REGISTRY_PULLSis set totrue, provide the hostname of the private container registry without namespaces. Otherwise, leave empty.SKIP_PUSH_IMAGES: Set totrueif you have retrieved the Dash Enterprise images into your private container registry before the installation. Otherwise, leavefalse.SKIP_REGISTRY_CHECK: Set totrueif you have retrieved the Dash Enterprise images into your private container registry before the installation. Otherwise, leavefalse.INSTALL_ISTIO: Leavefalseunless instructed to modify this (and allowing access toistio.ioover443on your server) by our Customer Success team.KURL_PRIVATE_IP: If your server has more than one network interface, specify the IP address for kURL to use when creating the Kubernetes cluster. If your server has a single network interface, leave this blank.
If your organization uses its own custom CA (with the internal root CA certificate installed on users’ systems), you can add the internal root CA certificate to Dash Enterprise with INTERNAL_CA_CERTIFICATE. It must be a .crt file and contain the root certificate only—not the full chain. Provide it as follows:
INTERNAL_CA_CERTIFICATE(optional): The name of your internal root CA certificate file, including its.crtextension.
Moving Files to Your Server
Move the following files to your VM:
- Your installation script,
install_de_ss_airgap.sh - Your config file,
config.local.sh - The package of preinstalled tools,
setup-tools.tar.gz - The script for entering the bootstrap pod,
enter_bootstrap_pod.sh - Your internal root CA certificate, if using
One way to do this is to use secure copy protocol (SCP).
Configuring the SSH Port
By default, Dash Enterprise expects app deployments over SSH to use port 22. In this step, you’ll map the Linux OpenSSH daemon (sshd) to a different port to free up port 22 for Dash Enterprise.
If you plan to customize the Git SSH port when configuring Dash Enterprise, then you can skip this step.
This procedure differs based on the operating system of your VM.
Don’t forget that to SSH into the VM in the future, you’ll need to append the new SSH port to the ssh command (for example, -p 2222).
Installation and Configuration
Creating the Cluster and Port-Forwarding the KOTS Admin Console
In this step, you’ll run the installation script from your server. This script does the following:
- Extracts the setup tools package.
- Installs Kubernetes via kURL.
- Creates the
plotly-systemnamespace. - Creates a bootstrap pod,
de5-bootstrap, inside theplotly-systemnamespace. - Authenticates your user to your private container registry for image pulls and pushes.
- Uses the tools in the bootstrap pod as well as the images in the private container registry to install Dash Enterprise.
- Generates a kubeconfig file (
~/.kube/config) to runkubectlcommands against the Kubernetes cluster. - Port-forwards the Admin Console so that you can use it to install Dash Enterprise.
The script takes several minutes to complete. Continue when you see the message Forwarding from 127.0.0.1:8800 -> 3000 (do not exit yet).
If you exit by mistake, restart the port-forward with
kubectl port-forward -n plotly-system svc/kotsadm 8800:3000.
Uploading the License and Airgap Bundle
Now that your cluster is created, you’re ready to install Dash Enterprise on it. The KOTS Admin Console will take you through uploading your Dash Enterprise license and airgap bundle.
To access the KOTS Admin Console and install Dash Enterprise:
-
On your workstation, open an SSH tunnel:
sh
   ssh -i /path/to/private/key <username>@<server-ip> -p 2222 -L 8800:localhost:8800
where/path/to/private/keyis the path to the private key,<username>is the username of your server, and<server-ip>is the IP address of your server. Omit-p 2222if you did not remap the SSH port, or change2222if you chose a different port. -
On your workstation, go to
http://localhost:8800. - Enter the password that you set for
ADMIN_PASSWORDin Defining Variables in the Script; then select Log in. You are prompted to upload your license. - Drag or browse to the license file in your Installation Plan; then select Upload license. The Admin Console opens to the Install in airgapped environment page, where your private container registry information is automatically entered.
- In the area labelled “Drag your airgap bundle here or choose a bundle to upload,” drag or browse to the Dash Enterprise
.airgapfile you downloaded earlier. - In the Registry settings, verify that your registry Hostname, Username, Password, and Registry Namespace are entered. If they aren’t, enter them.
- If you have not retrieved the Dash Enterprise images into your private container registry before the installation (
SKIP_PUSH_IMAGESandSKIP_REGISTRY_CHECKarefalsein your config file), clear the Disable Pushing Images to Registry checkbox. (Note that this setting will be saved and applied when you upgrade Dash Enterprise. Change it in the Admin Console registry settings if you don’t want to keep this workflow for Dash Enterprise upgrades). - Select Upload airgap bundle. The upload can take several minutes.
When the upload is complete, the KOTS Admin Console opens to the Configure Dash Enterprise page.
Uploading the Certificate and Running Preflight Checks
Now that Dash Enterprise is installed, you’re ready for configuration. The KOTS Admin Console will take you through several configuration options.
On the Configure Dash Enterprise page, do the following:
- In Hostname Settings, make sure your Dash Enterprise hostname is entered. If it isn’t, enter it, making sure it corresponds to the value for
DE_HOSTNAMEin your config file. - In TLS Settings, make sure that Upload TLS Certificate and Key is selected, and then upload your TLS/SSL certificate and key.
- In Git Settings, review the Git SSH Port. The Git SSH port is set to 22 by default. If you change this port, consider the following carefully:
* App developers will need to modify their SSH config in order to deploy over SSH from their workstations.
* You don’t need to open your chosen port to any IPs; it just needs to be available (not bound to any other service).
* You cannot use ports 80 or 443 for the Git SSH port.
* After changing the default Git SSH port, you can close or restrict port 22. - If you plan to set up Dash Enterprise authentication with an external SAML, OIDC, or LDAP server, and this server uses a self-signed certificate, configure Dash Enterprise to trust the server:
- Under Auth Settings, select Upload Self-signed / Internal Public CA Certificate. A file upload field appears.
-
Drag or browse to the certificate that will establish trust. This certificate has the following requirements:
- It must be a DER or base64-encoded file.
- The Common Name (Server Name) in the certificate must be set to the fully qualified domain name (FQDN) that Dash Enterprise will use to reach your server.
Depending on how the IdP certificate is signed, and whether there are intermediate certificate authorities (CAs), you may need to use the full certificate chain.
You can upload this certificate later, but Dash Enterprise will be unable to communicate with the server until it can establish trust.
Learn more about which authentication methods are supported.
5. In PIP_EXTRA_INDEX_URL, enter the URL of your organization’s private Python package index (you can also configure it later). This will cause all apps and workspaces on Dash Enterprise to be able to fetch dependencies from this index.
6. Select Continue. The Admin Console runs preflight checks, which can take up to a few minutes.
7. Wait for the preflight checks to complete. If the results are all successful, select Deploy. If you encounter an error, contact Customer Success.
The Admin Console opens to the dashboard, where the status of the system is displayed.
8. Wait for the status to change to Ready. This can take up to a few minutes.
<img>
- Press
Ctrl+Cto disconnect from the Admin Console.
You can now access the Admin Console using its sub-domain: https://admin-<your-dash-enterprise-server>.
Accessing Dash Enterprise
Dash Enterprise uses Keycloak for identity and access management. During the installation, an initial Keycloak admin user was created to allow you to access the Keycloak Administration Console. As part of Keycloak security best practices, you’ll create a second Keycloak admin user. With this new Keycloak admin user, you’ll create the Dash Enterprise account that you’ll use to log in to https://<your-dash-enterprise-server>.
Creating the Keycloak Admin User
In this step, you’ll retrieve the password for the initial Keycloak admin user and use it to create a new admin user.
To create the new Keycloak admin user:
- On your VM, retrieve the password for the initial Keycloak admin user (this displays the password in plain text):
sh
   kubectl get secret keycloak-secrets -n plotly-system -o jsonpath='{.data.KEYCLOAK_PASSWORD}' | base64 -d && echo
- Copy the password.
- Go to
https://auth-<your-dash-enterprise-server> - Select Administration Console.
- Enter the username admin and the password that you retrieved in step 1; then select Sign In.
<img>
A warning message is displayed that recommends you create a new admin user and delete the existing one. Important: Do not delete nor edit the initial Keycloak admin user. This user is managed by Dash Enterprise.
- Make sure that Keycloak (master) is selected in the realm list in the top left corner.
- Select Users > Add User.
- In Username, enter the username that you want for the Keycloak admin user.
- Select Create. Additional settings become available.
- Go to Credentials.
- Select Set password.
- In Password and Password confirmation, enter the password you want to use.
- Select Save; then Save password to confirm.
- (Recommended) Add the username and password to your organization’s password manager or other secure storage. You can share these credentials with other members in your organization who need to access Keycloak.
- Assign the Keycloak
adminrole:- Go to Role mapping.
- Select Assign role.
- Change the filter to Filter by realm roles.
- Find and select the role called “admin”.
- Select Assign.
Use this user from now on when logging in to Keycloak.
You can rotate the password for this user in Keycloak by going back to the Keycloak (master) realm, editing the user, and changing the Password that is set. Note that managing this user is the only reason to go to the Keycloak (master) realm. All Dash Enterprise user management is done in a different realm.
Creating Your Dash Enterprise User
In this step, you’ll log in to Keycloak using the newly created admin user and create a Dash Enterprise user that has admin permissions at the Dash Enterprise level. Dash Enterprise administrators have access to the Admin section of the Dash Enterprise App Manager, which you’ll use to configure system limits in a later step. Learn more about Dash Enterprise permissions.
To create your Dash Enterprise user:
- If you’re still logged in to Keycloak with the initial admin user, log out and back in with the new admin user.
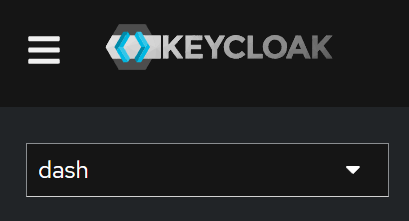
-
Go to the realm responsible for Dash Enterprise users by selecting dash from the realm list in the top left corner.
-
Select Users > Add User.
- In Username, enter the username that you want to use when logging in to Dash Enterprise.
- Select Create. Additional settings become available.
- Go to Credentials.
- Select Set password.
- In Password and Password confirmation, enter the password you want to use.
- Select Save; then Save password to confirm.
- Assign the Dash Enterprise
adminrole:- Go to Role mapping.
- Select Assign role.
- Change the filter to Filter by clients.
- Find and select the role called “
dashadmin”. Note that if you intend on deploying apps, you’ll also need the “dashlicensed_user” role, and assigning this role consumes a license seat. - Select Assign.
You can now log in to https://<your-dash-enterprise-server> using the credentials for the newly created Dash Enterprise user. Dash Enterprise opens to the Portal. Go to the App Manager by selecting Apps > App Manager.
<img>
Setting System Limits
In this step, you’ll safeguard Dash Enterprise against usage that would cause the Kubernetes cluster to exceed the resources it can support. Specifically, you’ll add limits to the amount of pods and volumes (PVC) that can exist, temporarily preventing Dash app developers from performing actions that would create more pods and volumes on the cluster when the limit is reached. To do so, you’ll use the System Limits setting in the Admin section of the App Manager. To learn how to calculate and set limits that are appropriate for your cluster, go to Pod and Volume Limits.