Basic Dash Callbacks
This is the 2nd chapter of the Dash Fundamentals.
The previous chapter covered the Dash applayout
and the next chapter covers interactive graphing.
Just getting started? Make sure to install the necessary dependencies.
In the previous chapter we learned that app.layout describes what the app looks like and is a hierarchical tree of components.
The Dash HTML Components (dash.html) module provides classes for all of the HTML tags, and the keyword arguments describe the HTML attributes like style, className, and id.
The Dash Core Components (dash.dcc) module generates higher-level components like controls and graphs.
This chapter describes how to make your Dash apps using callback functions: functions that are automatically called by Dash whenever an input component’s property changes, in order to update some property in another component (the output).
For optimum user-interaction and chart loading performance, production
Dash apps should consider the Job Queue,
HPC, Datashader,
and horizontal scaling capabilities of Dash Enterprise.
Let’s get started with a simple example of an interactive Dash app.
Simple Interactive Dash App
If you’re using Dash Enterprise’s Data Science Workspaces,
copy and paste the below code into your workspace (see video).
from dash import Dash, dcc, html, Input, Output, callback

app = Dash()

app.layout = html.Div([
    html.H6("Change the value in the text box to see callbacks in action!"),
    html.Div([
        "Input: ",
        dcc.Input(id='my-input', value='initial value', type='text')
    ]),
    html.Br(),
    html.Div(id='my-output'),

])


@callback(
    Output(component_id='my-output', component_property='children'),
    Input(component_id='my-input', component_property='value')
)
def update_output_div(input_value):
    return f'Output: {input_value}'


if __name__ == '__main__':
    app.run(debug=True)
Change the value in the text box to see callbacks in action!
Let’s break down this example:
- The “inputs” and “outputs” of our application are described
as the arguments of the@callbackdecorator.
Learn more about using the @callback decorator.
Learn more about using the @callback decorator.
a. By writing this decorator, we’re telling Dash to call this function for us whenever the value of the “input” component (the text box) changes in order to update the children of the “output” component on the page (the HTML div).
b. You can use any name for the function that is wrapped by the @callback decorator. The convention is that the name describes the callback output(s).
c. You can use any name for the function arguments, but you must use the same names inside the callback function as you do in its definition, just like in a regular Python function. The arguments are positional by default: first the Input items and then any State items are given in the same order as in the decorator. You also have the option to use named keyword arguments, instead of positional. See the Flexible Callback Signatures chapter for more information.
d. You must use the same id you gave a Dash component in the app.layout when referring to it as either an input or output of the @callback decorator.
e. The @callback decorator needs to be directly above the callback function declaration. If there is a blank line between the decorator and the function definition, the callback registration will not be successful.
f. If you’re curious about what the decorator syntax means under the hood, you can read this StackOverflow answer and learn more about decorators by reading PEP 318 – Decorators for Functions and Methods.
- In Dash, the inputs and outputs of our application are simply the
properties of a particular component. In this example,
our input is the “value” property of the component that has the ID
“my-input”. Our output is the “children” property of the
component with the ID “my-output”. - Whenever an input property changes, the function that the callback decorator wraps will get called automatically.
Dash provides this callback function with the new value of the input property as
its argument, and Dash updates the property of the output component
with whatever was returned by the function. - The
component_idandcomponent_propertykeywords are optional
(there are only two arguments for each of those objects).
They are included in this example for clarity but will be omitted in the rest of the documentation for the sake of brevity and readability. - Don’t confuse the
dash.dependencies.Inputobject and thedcc.Inputobject. The former is just used in these callback definitions and the latter is an actual component. - Notice how we don’t set a value for the
childrenproperty of the
my-outputcomponent in thelayout. When the Dash app starts, it
automatically calls all of the callbacks with the initial values of the
input components in order to populate the initial state of the output
components. In this example, if you specified the div component as
html.Div(id='my-output', children='Hello world'),
it would get overwritten when the app starts.
It’s sort of like programming with Microsoft Excel:
whenever a cell changes (the input), all the cells that depend on that cell (the outputs)
will get updated automatically. This is called “Reactive Programming” because the outputs react to changes in the inputs automatically.
Remember how every component is described entirely through its
set of keyword arguments? Those arguments that we set in
Python become properties of the component,
and these properties are important now.
With Dash’s interactivity, we can dynamically update any of those properties
using callbacks. Often we’ll update the children property of HTML
components to display new text (remember that children is responsible for the contents of a component) or the figure property of a dcc.Graph
component to display new data. We could also update the style of a
component or even the available options of a dcc.Dropdown component!
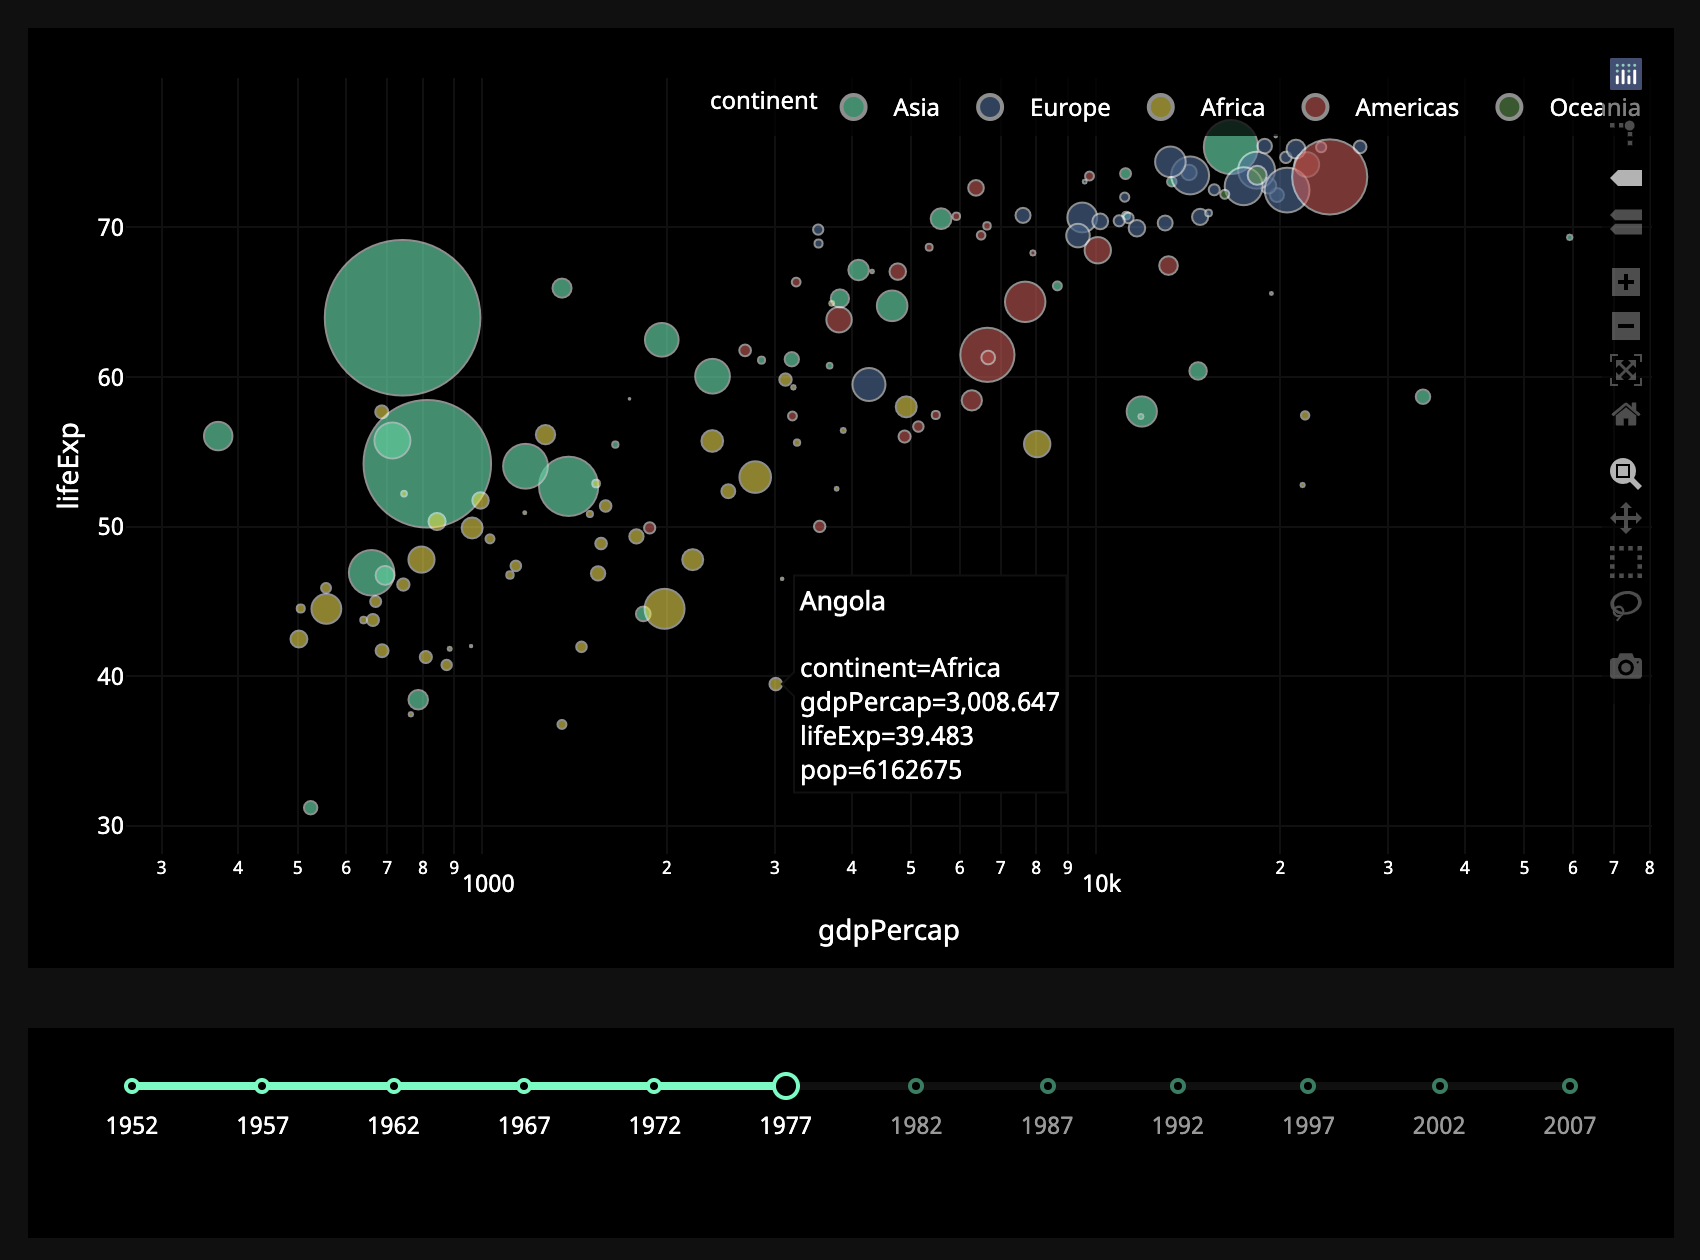
Let’s take a look at another example where a dcc.Slider updates
a dcc.Graph.
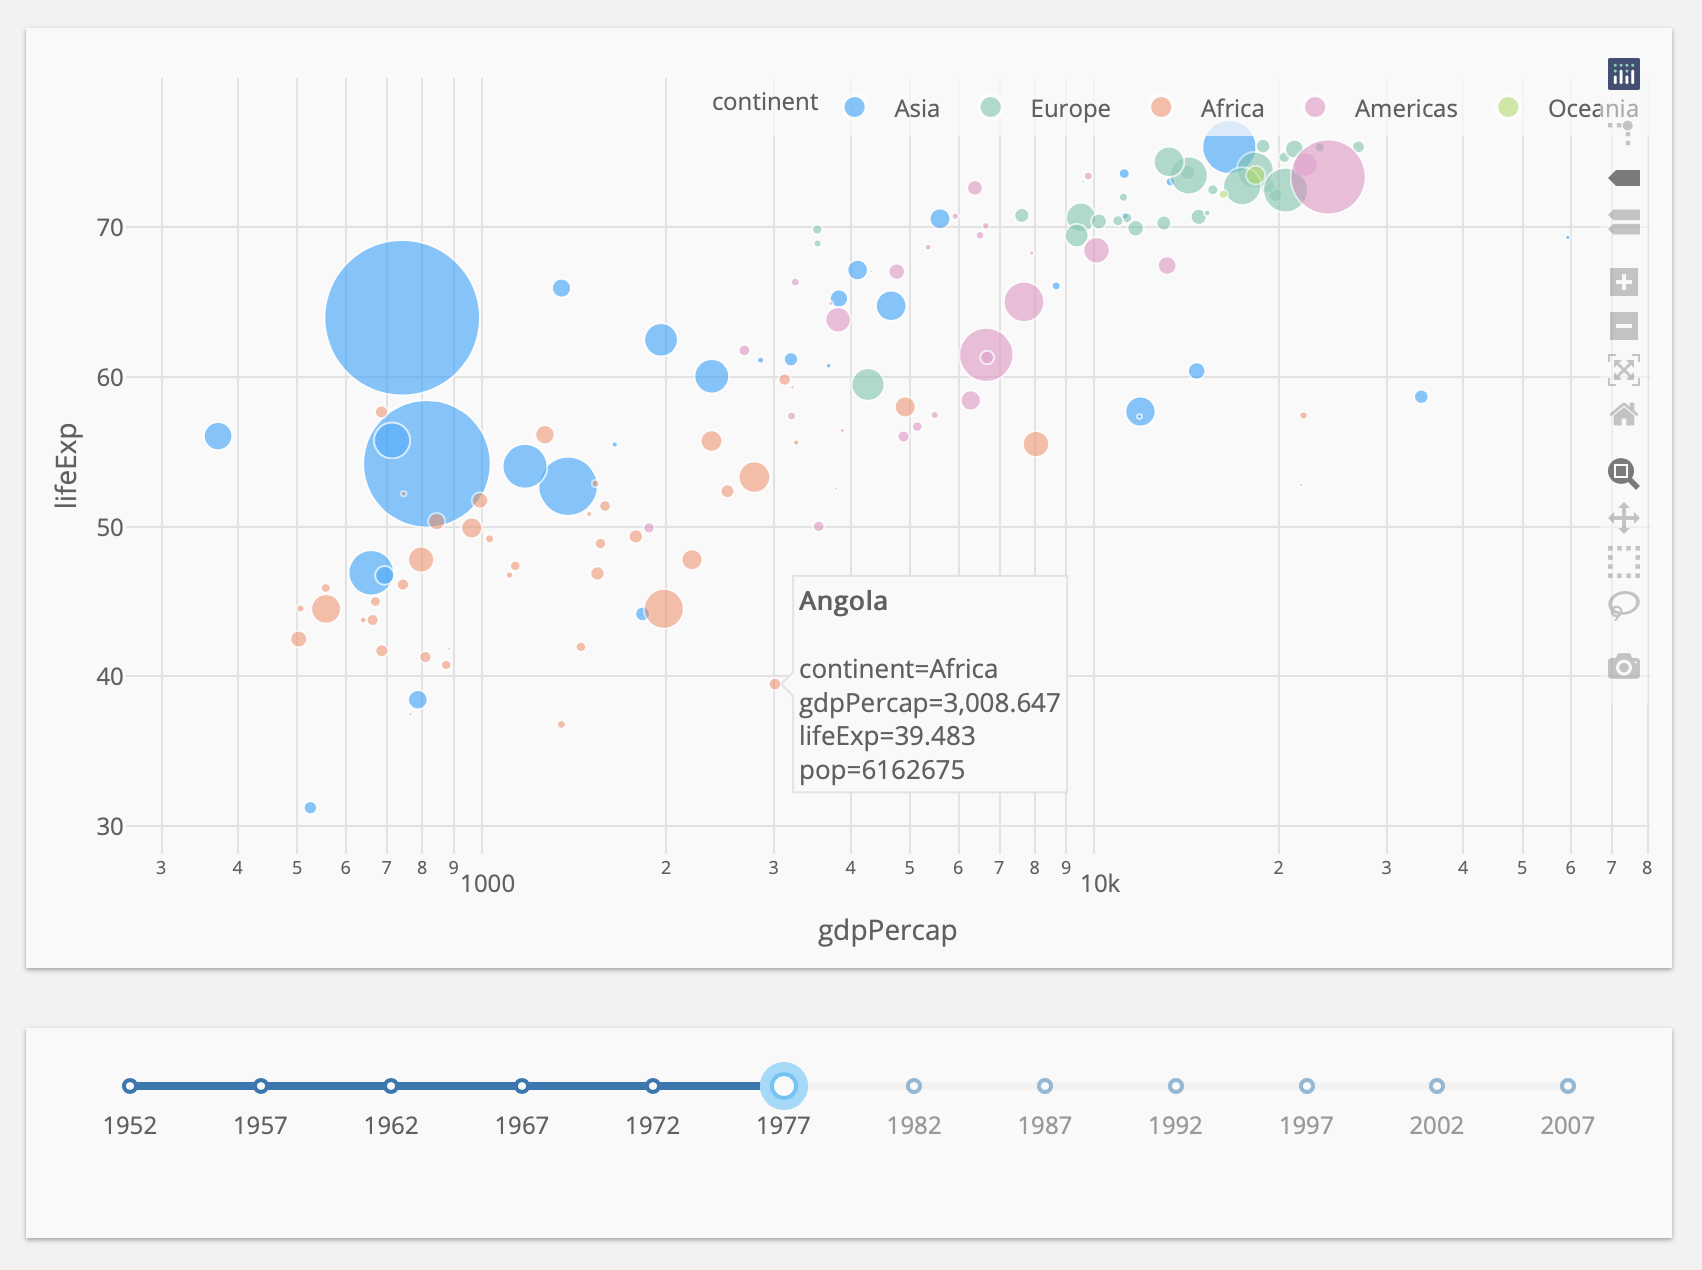
Dash App Layout With Figure and Slider
from dash import Dash, dcc, html, Input, Output, callback
import plotly.express as px

import pandas as pd

df = pd.read_csv('https://raw.githubusercontent.com/plotly/datasets/master/gapminderDataFiveYear.csv')

app = Dash()

app.layout = html.Div([
    dcc.Graph(id='graph-with-slider'),
    dcc.Slider(
        df['year'].min(),
        df['year'].max(),
        step=None,
        value=df['year'].min(),
        marks={str(year): str(year) for year in df['year'].unique()},
        id='year-slider'
    )
])


@callback(
    Output('graph-with-slider', 'figure'),
    Input('year-slider', 'value'))
def update_figure(selected_year):
    filtered_df = df[df.year == selected_year]

    fig = px.scatter(filtered_df, x="gdpPercap", y="lifeExp",
                     size="pop", color="continent", hover_name="country",
                     log_x=True, size_max=55)

    fig.update_layout(transition_duration=500)

    return fig


if __name__ == '__main__':
    app.run(debug=True)
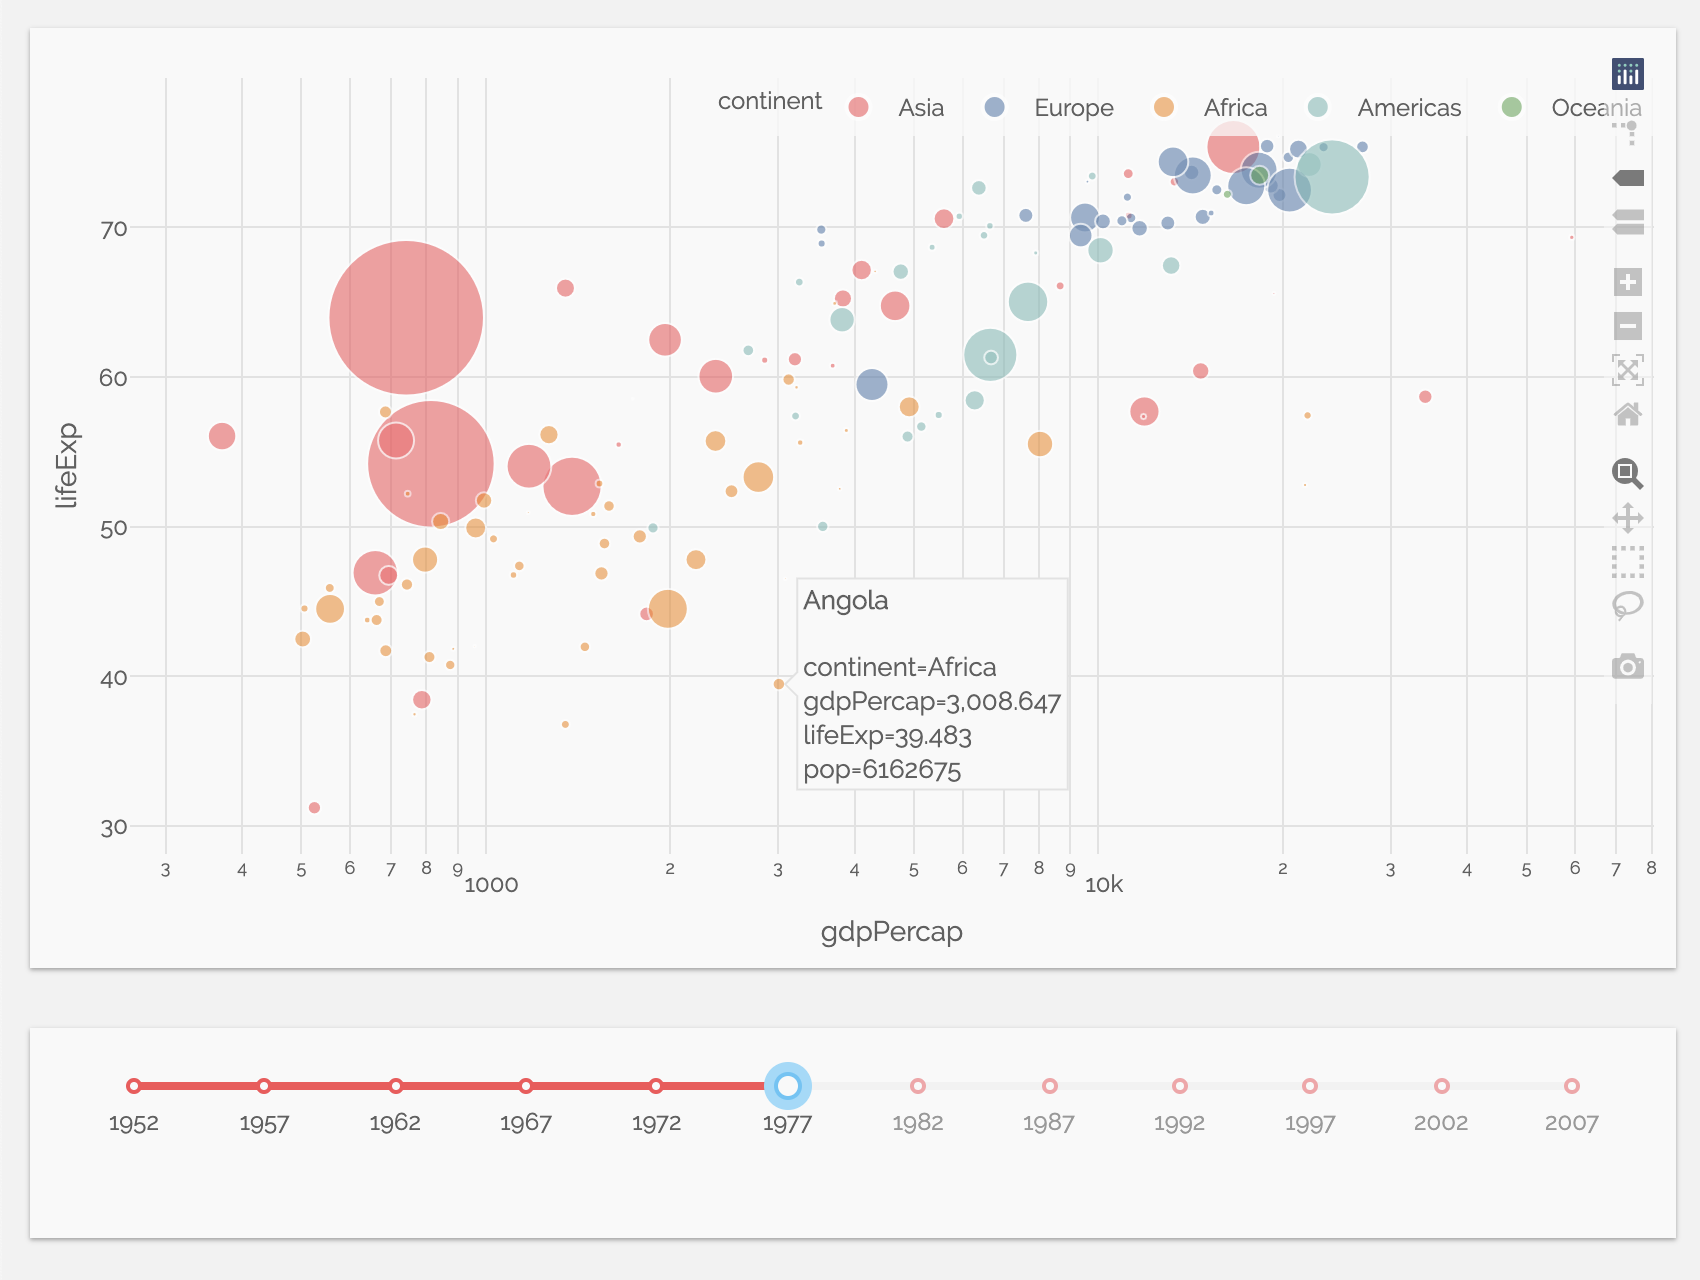
Theming with Dash Enterprise Design Kit
Theming with Dash Enterprise Design Kit
Default Theme
Mars Theme
Neptune Theme
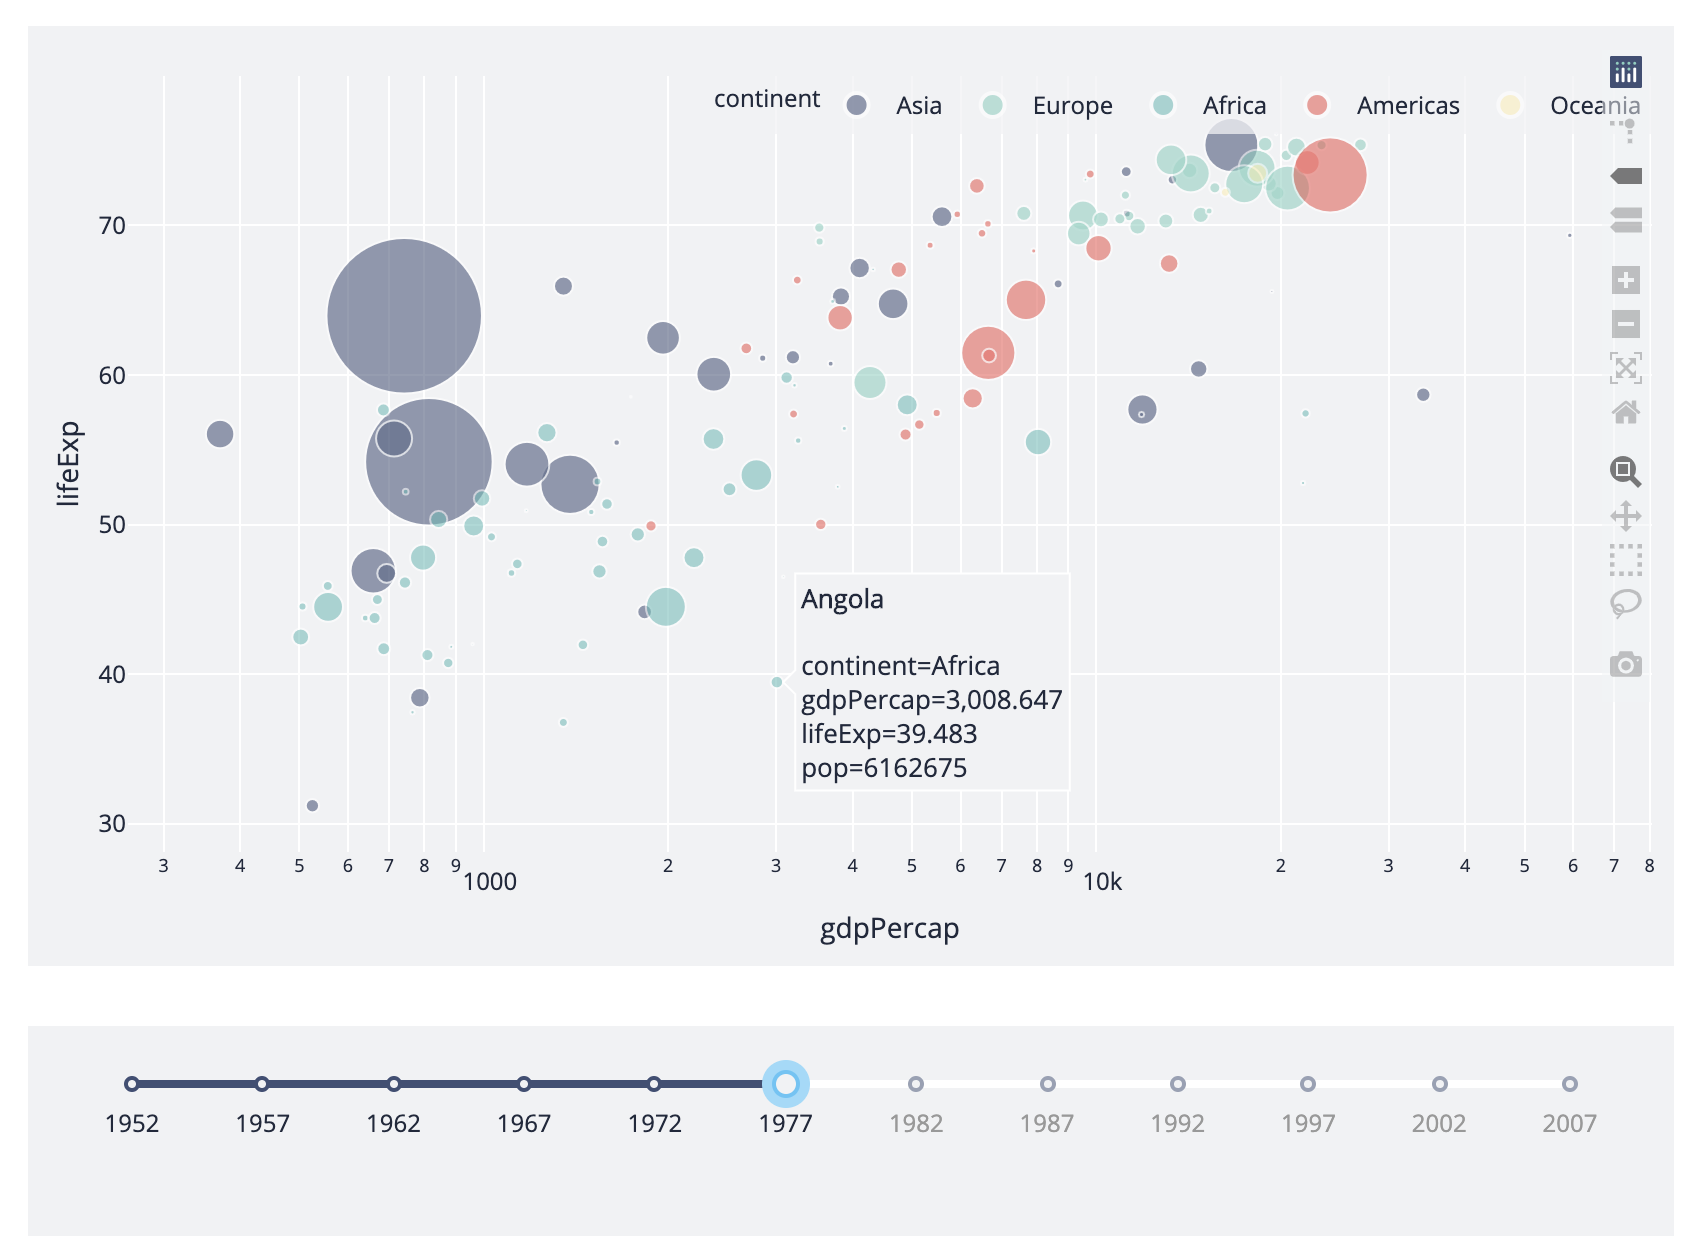
Miller Theme
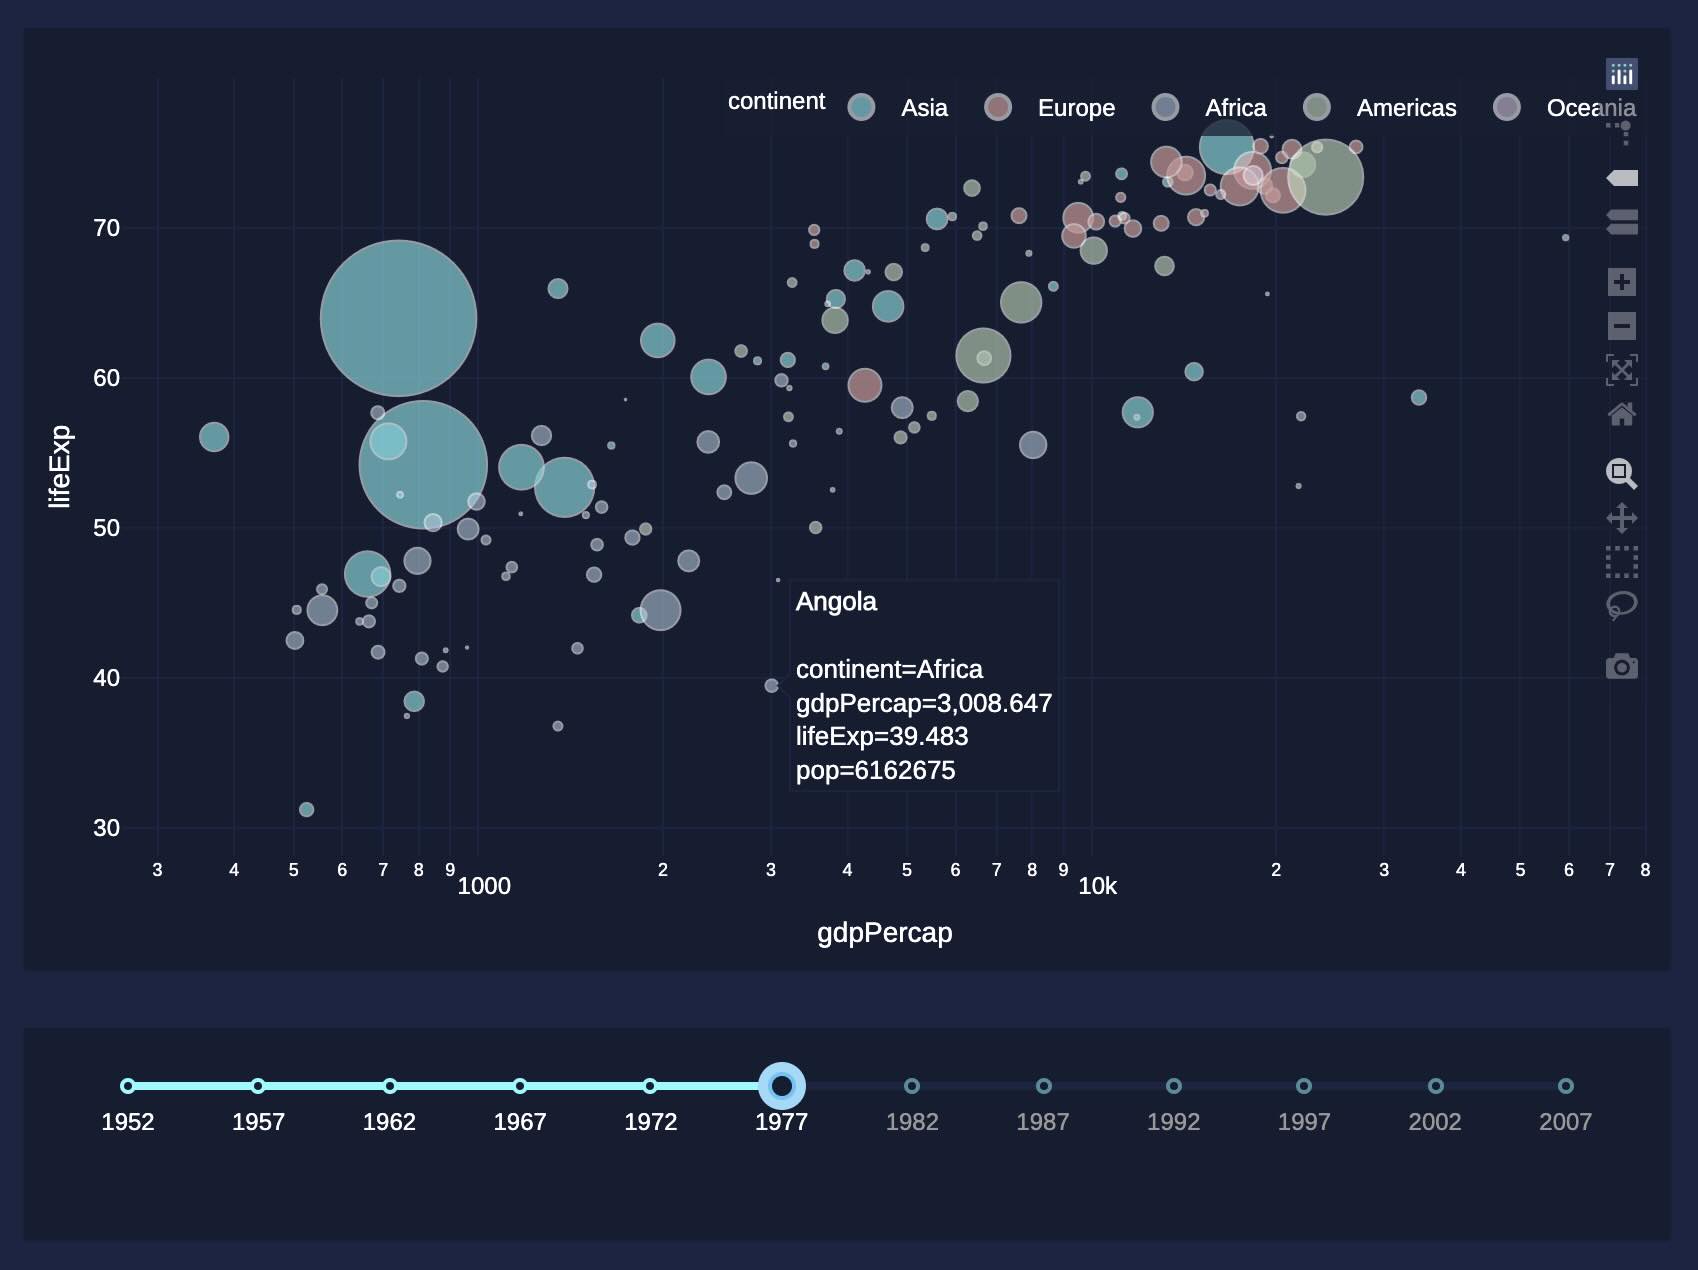
Extrasolar Theme
Preset Themes

In this example, the "value" property of the dcc.Slider is the
input of the app, and the output of the app is the "figure" property of the
dcc.Graph.
Whenever the value of the dcc.Slider changes, Dash calls the
callback function update_figure with the new value. The function filters the
dataframe with this new value, constructs a figure object,
and returns it to the Dash application.
There are a few nice patterns in this example:
- We use the Pandas library to
load our dataframe at the start of the app:
df = pd.read_csv('...').
This dataframedfis in the global state of the app and can be
read inside the callback functions. - Loading data into memory can be expensive. By loading or querying data at
the start of the app instead of inside the callback functions, we ensure
that this operation is only done once – when the app server starts. When a user
visits the app or interacts with the app, that data (df) is already in memory.
If possible, expensive initialization (like downloading or querying
data) should be done in the global scope of the app instead of within
the callback functions. -
The callback does not modify the original data, it only creates copies
of the dataframe by filtering using pandas.
This is important: your callbacks should never modify variables
outside of their scope. If your callbacks modify global state, then one
user’s session might affect the next user’s session and when the app is
deployed on multiple processes or threads, those modifications will not
be shared across sessions. -
We are turning on transitions with
layout.transitionto give an idea
of how the dataset evolves with time: transitions allow the chart to
update from one state to the next smoothly, as if it were animated.
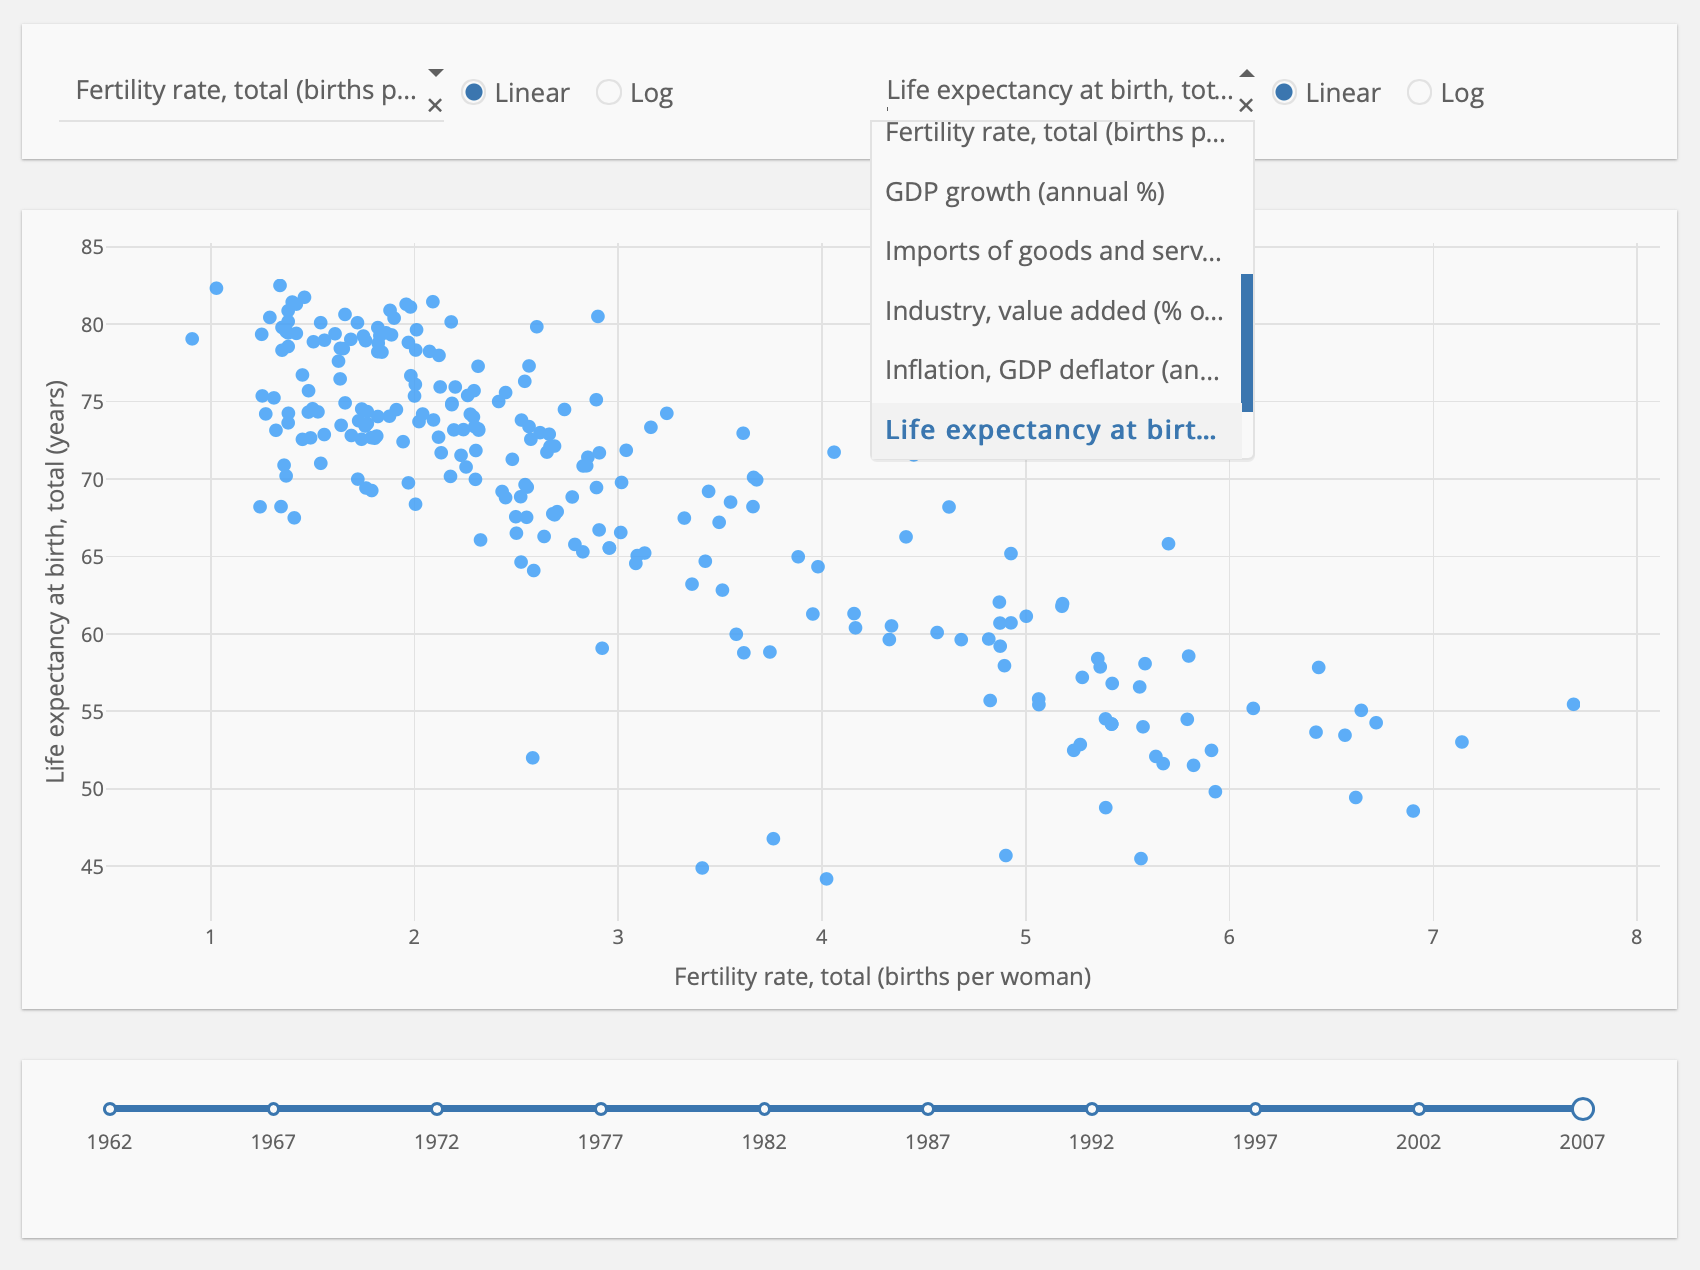
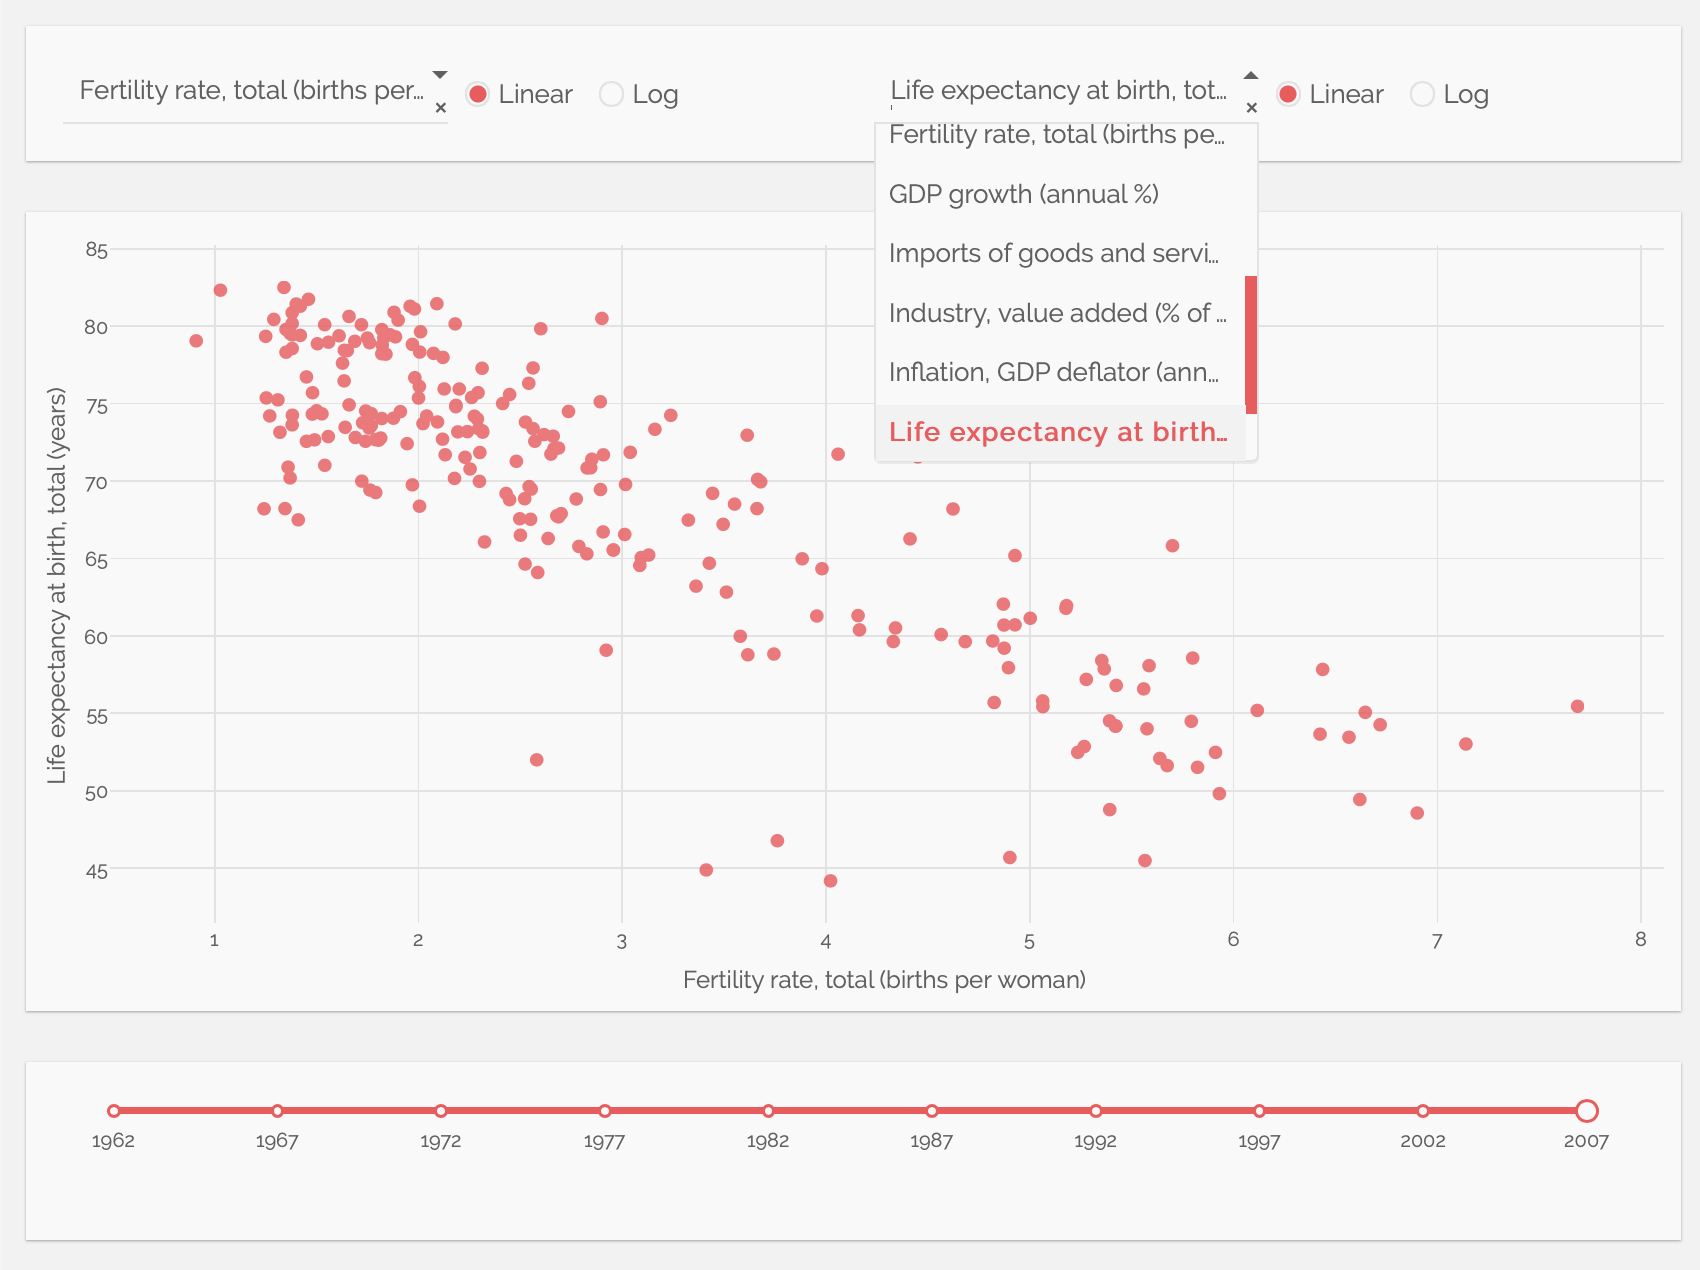
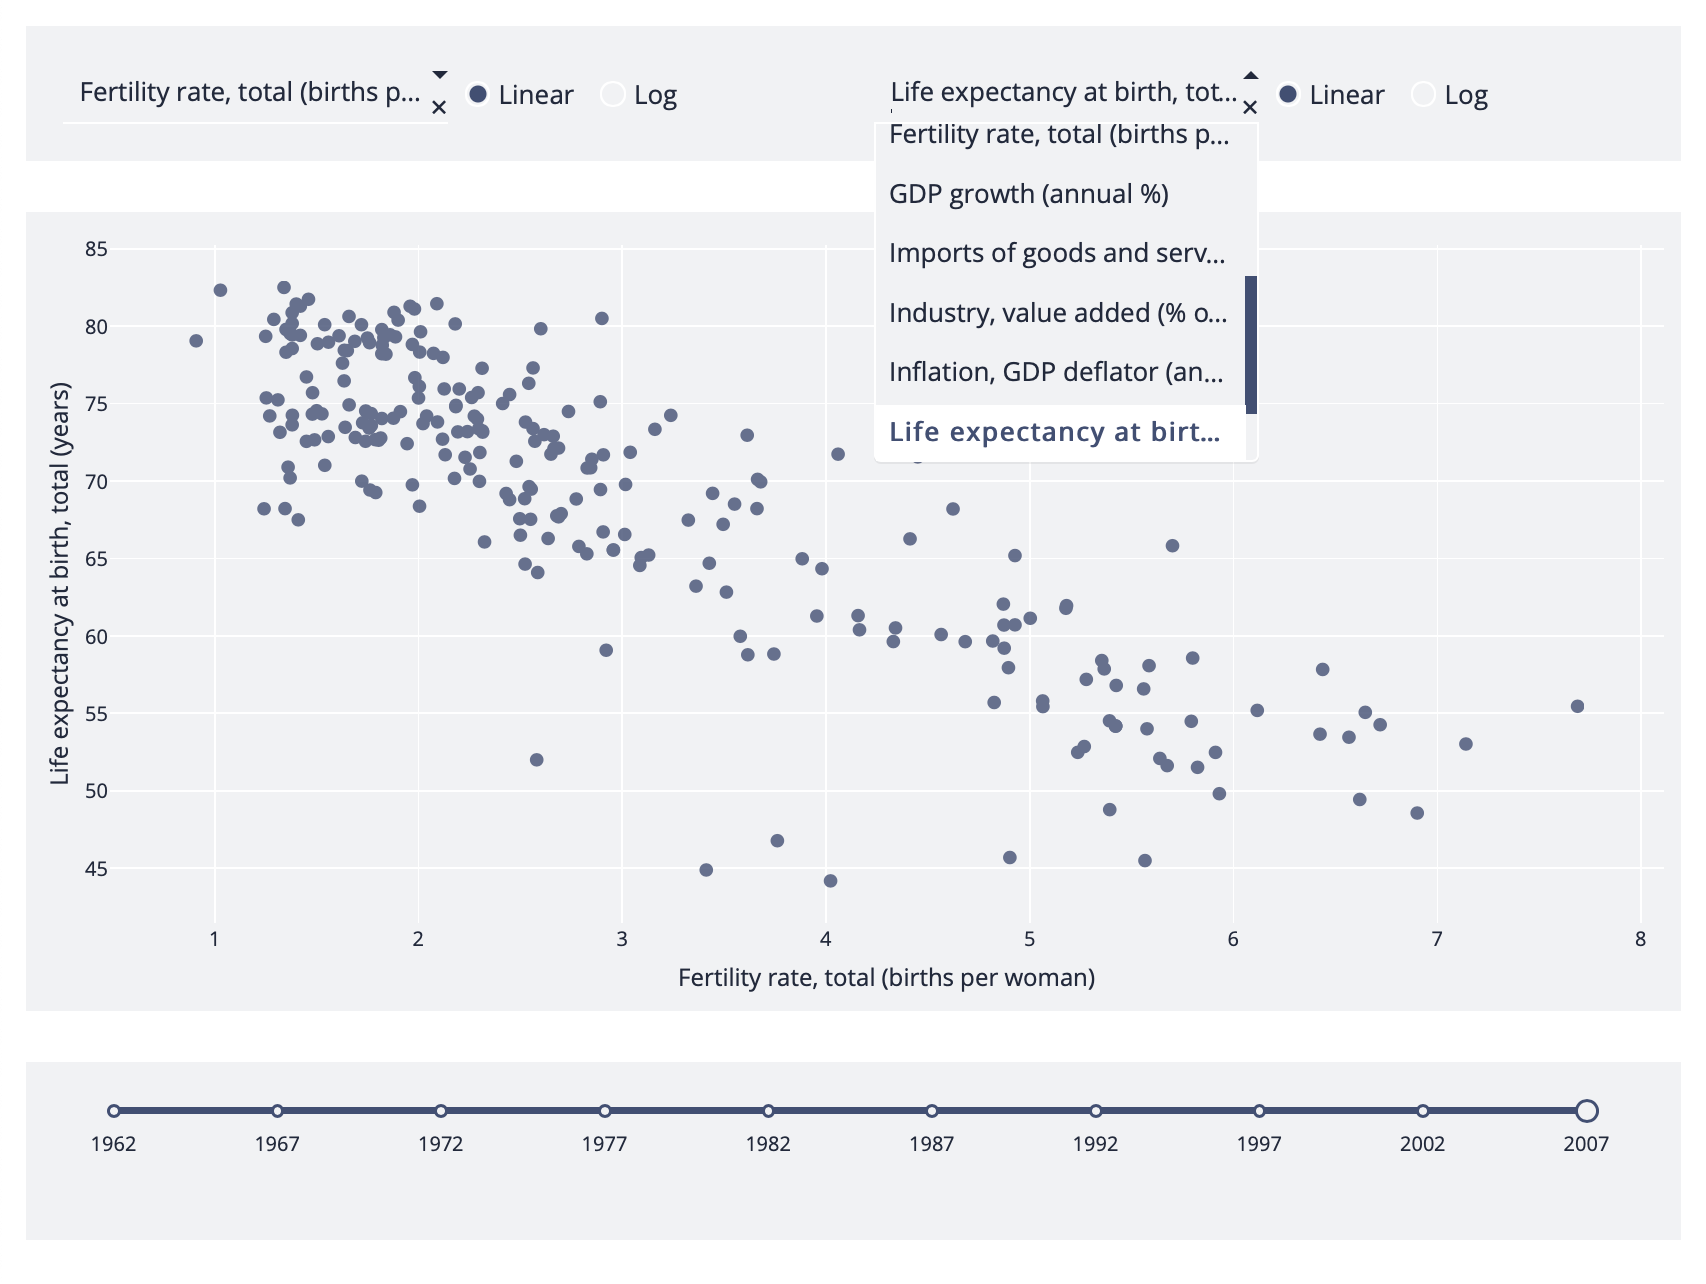
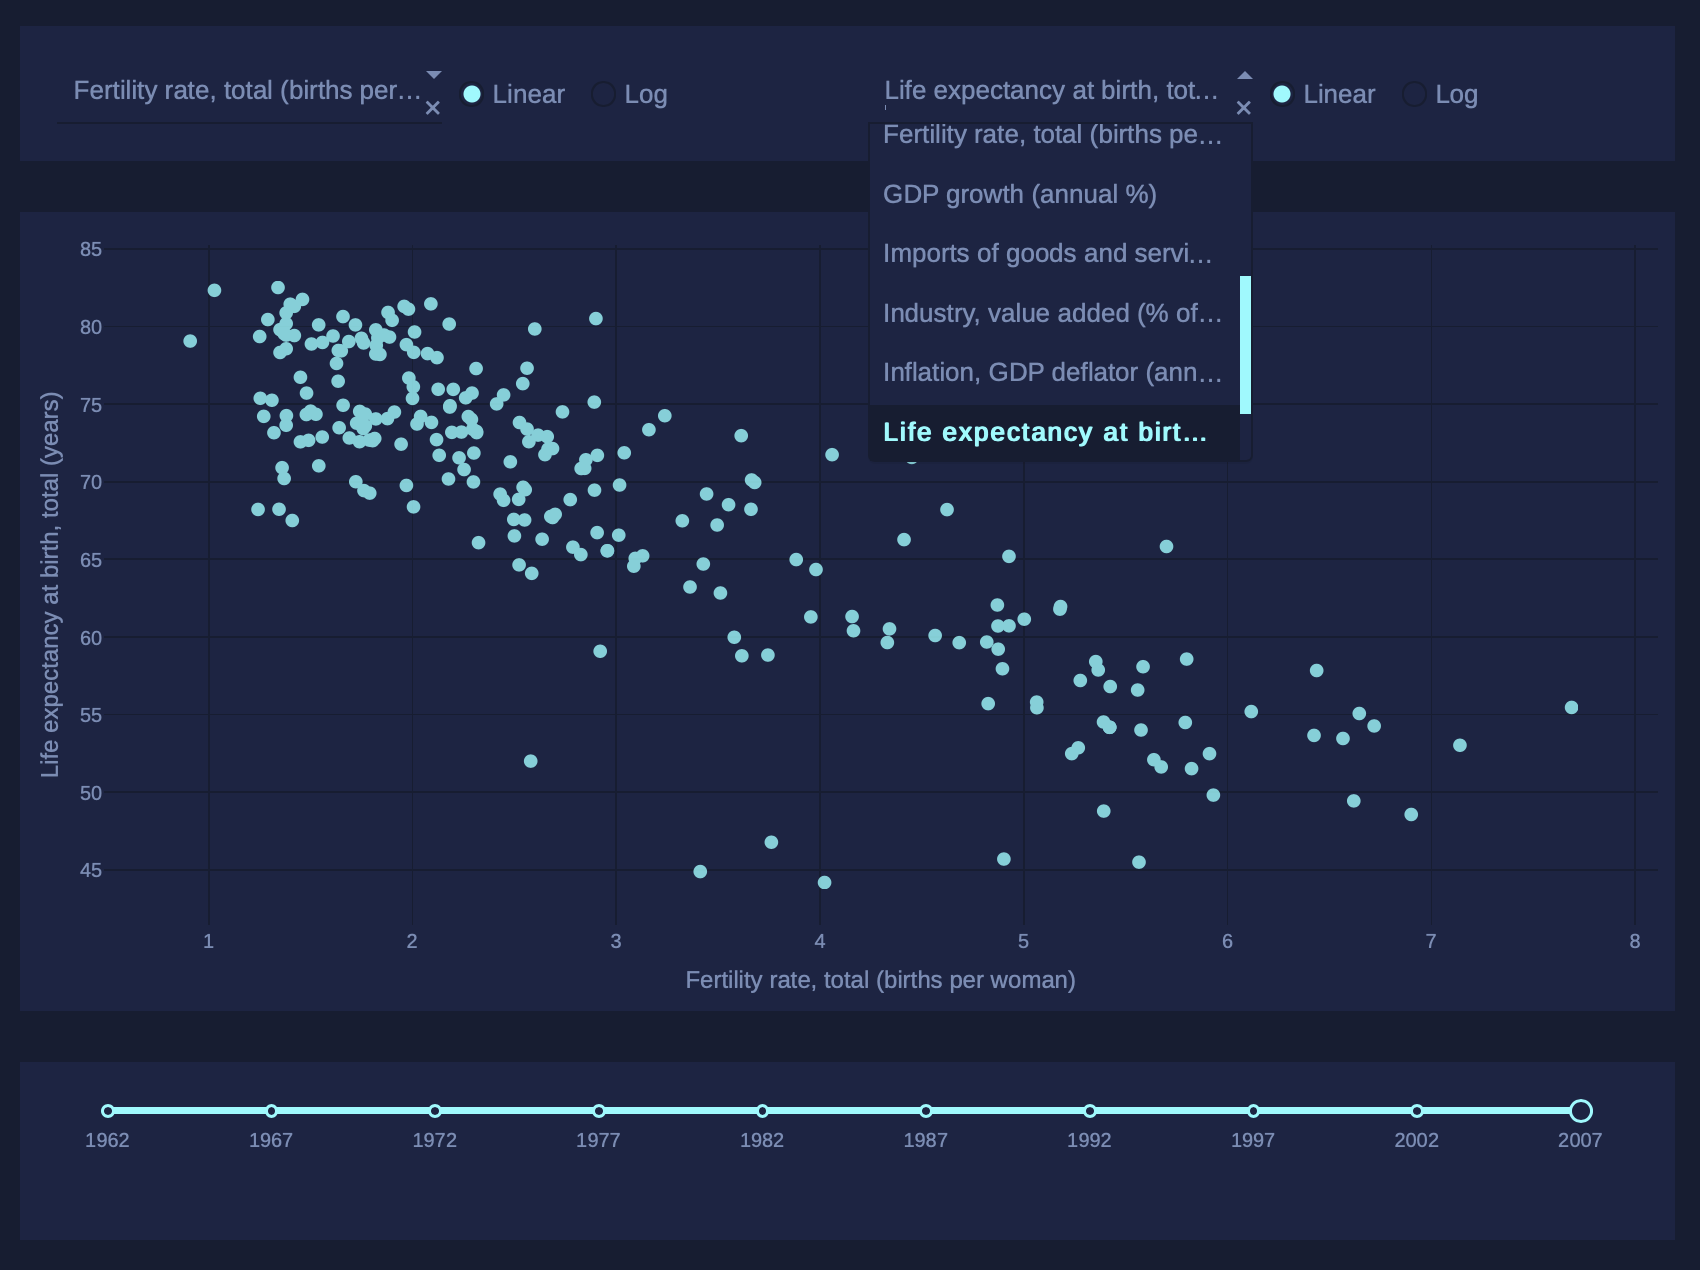
Dash App With Multiple Inputs
In Dash, any “output” can have multiple “input” components.
Here’s a simple example that binds five inputs
(the value property of two dcc.Dropdown components,
two dcc.RadioItems components, and one dcc.Slider component)
to one output component (the figure property of the dcc.Graph component).
Notice how app.callback lists all five Input items after the Output.
from dash import Dash, dcc, html, Input, Output, callback
import plotly.express as px

import pandas as pd

app = Dash()

df = pd.read_csv('https://plotly.github.io/datasets/country_indicators.csv')

app.layout = html.Div([
    html.Div([

        html.Div([
            dcc.Dropdown(
                df['Indicator Name'].unique(),
                'Fertility rate, total (births per woman)',
                id='xaxis-column'
            ),
            dcc.RadioItems(
                ['Linear', 'Log'],
                'Linear',
                id='xaxis-type',
                inline=True
            )
        ], style={'width': '48%', 'display': 'inline-block'}),

        html.Div([
            dcc.Dropdown(
                df['Indicator Name'].unique(),
                'Life expectancy at birth, total (years)',
                id='yaxis-column'
            ),
            dcc.RadioItems(
                ['Linear', 'Log'],
                'Linear',
                id='yaxis-type',
                inline=True
            )
        ], style={'width': '48%', 'float': 'right', 'display': 'inline-block'})
    ]),

    dcc.Graph(id='indicator-graphic'),

    dcc.Slider(
        df['Year'].min(),
        df['Year'].max(),
        step=None,
        id='year--slider',
        value=df['Year'].max(),
        marks={str(year): str(year) for year in df['Year'].unique()},

    )
])


@callback(
    Output('indicator-graphic', 'figure'),
    Input('xaxis-column', 'value'),
    Input('yaxis-column', 'value'),
    Input('xaxis-type', 'value'),
    Input('yaxis-type', 'value'),
    Input('year--slider', 'value'))
def update_graph(xaxis_column_name, yaxis_column_name,
                 xaxis_type, yaxis_type,
                 year_value):
    dff = df[df['Year'] == year_value]

    fig = px.scatter(x=dff[dff['Indicator Name'] == xaxis_column_name]['Value'],
                     y=dff[dff['Indicator Name'] == yaxis_column_name]['Value'],
                     hover_name=dff[dff['Indicator Name'] == yaxis_column_name]['Country Name'])

    fig.update_layout(margin={'l': 40, 'b': 40, 't': 10, 'r': 0}, hovermode='closest')

    fig.update_xaxes(title=xaxis_column_name,
                     type='linear' if xaxis_type == 'Linear' else 'log')

    fig.update_yaxes(title=yaxis_column_name,
                     type='linear' if yaxis_type == 'Linear' else 'log')

    return fig


if __name__ == '__main__':
    app.run(debug=True)
Theming with Dash Enterprise Design Kit
Theming with Dash Enterprise Design Kit
Default Theme
Mars Theme
Neptune Theme
Miller Theme
Extrasolar Theme
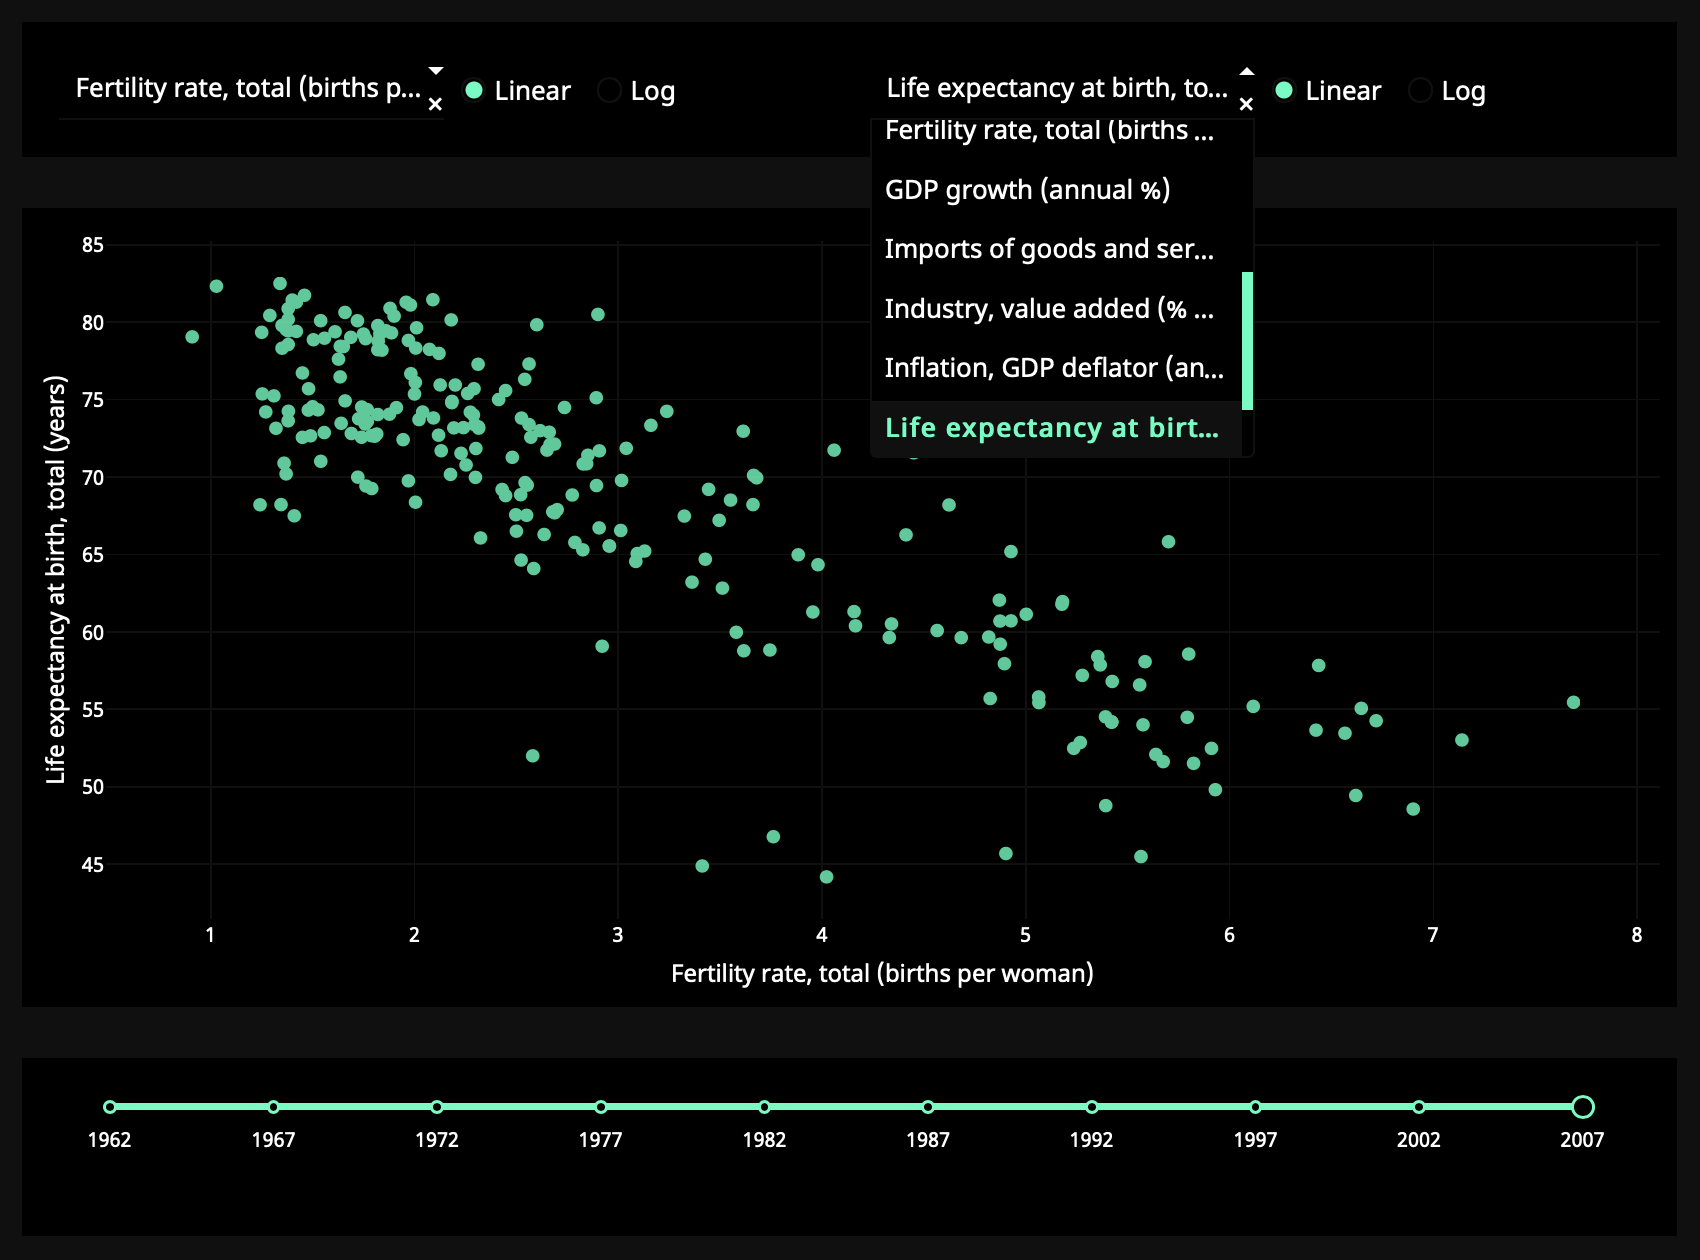
Design Kit Theme Editor
In this example, the callback executes whenever the value property of any of the
dcc.Dropdown, dcc.Slider,
or dcc.RadioItems components change.
The input arguments of the callback are the current
value of each of the “input” properties, in the order that they were
specified.
Even though only a single Input changes at a time (i.e. a user can only change
the value of a single Dropdown in a given moment), Dash collects the
current state of all the specified Input properties and passes them
into the callback function. These callback functions are always guaranteed
to receive the updated state of the app.
Let’s extend our example to include multiple outputs.
Dash App With Multiple Outputs
So far all the callbacks we’ve written only update a single Output property.
We can also update several outputs at once: list all the properties you want to update
in app.callback,
and return that many items from the callback. This is particularly useful if
two outputs depend on the same computationally intensive intermediate result,
such as a slow database query.
from dash import Dash, dcc, html, Input, Output, callback

external_stylesheets = ['https://codepen.io/chriddyp/pen/bWLwgP.css']

app = Dash(__name__, external_stylesheets=external_stylesheets)

app.layout = html.Div([
    dcc.Input(id='num-multi', type='number', value=5, min=-10, max=10),
    html.Table([
        html.Tr([html.Td(['x', html.Sup(2)]), html.Td(id='square')]),
        html.Tr([html.Td(['x', html.Sup(3)]), html.Td(id='cube')]),
        html.Tr([html.Td([2, html.Sup('x')]), html.Td(id='twos')]),
        html.Tr([html.Td([3, html.Sup('x')]), html.Td(id='threes')]),
        html.Tr([html.Td(['x', html.Sup('x')]), html.Td(id='x^x')]),
    ]),
])


@callback(
    Output('square', 'children'),
    Output('cube', 'children'),
    Output('twos', 'children'),
    Output('threes', 'children'),
    Output('x^x', 'children'),
    Input('num-multi', 'value'))
def callback_a(x):
    if x is None:
         return "", "", "", "", ""
    return x**2, x**3, 2**x, 3**x, x**x


if __name__ == '__main__':
    app.run(debug=True)
| x 2 | |
| x 3 | |
| 2 x | |
| 3 x | |
| x x |
A word of caution: it’s not always a good idea to combine outputs, even if
you can:
- If the outputs depend on some, but not all, of the same inputs, then keeping
them separate can avoid unnecessary updates. - If the outputs have the same inputs but they perform very different computations with these
inputs, keeping the callbacks separate can allow them to run in parallel.
Dash App With Chained Callbacks
You can also chain outputs and inputs together: the output of one callback
function could be the input of another callback function.
This pattern can be used to create dynamic UIs where, for example, one input component
updates the available options of another input component.
Here’s a simple example.
from dash import Dash, dcc, html, Input, Output, callback

external_stylesheets = ['https://codepen.io/chriddyp/pen/bWLwgP.css']

app = Dash(__name__, external_stylesheets=external_stylesheets)

all_options = {
    'America': ['New York City', 'San Francisco', 'Cincinnati'],
    'Canada': ['Montréal', 'Toronto', 'Ottawa']
}
app.layout = html.Div([
    dcc.RadioItems(
        list(all_options.keys()),
        'America',
        id='countries-radio',
    ),

    html.Hr(),

    dcc.RadioItems(id='cities-radio'),

    html.Hr(),

    html.Div(id='display-selected-values')
])


@callback(
    Output('cities-radio', 'options'),
    Input('countries-radio', 'value'))
def set_cities_options(selected_country):
    return [{'label': i, 'value': i} for i in all_options[selected_country]]


@callback(
    Output('cities-radio', 'value'),
    Input('cities-radio', 'options'))
def set_cities_value(available_options):
    return available_options[0]['value']


@callback(
    Output('display-selected-values', 'children'),
    Input('countries-radio', 'value'),
    Input('cities-radio', 'value'))
def set_display_children(selected_country, selected_city):
    return f'{selected_city} is a city in {selected_country}'


if __name__ == '__main__':
    app.run(debug=True)
The first callback updates the available options in the second
dcc.RadioItems component based off of the selected value in the
first dcc.RadioItems component.
The second callback sets an initial value when the options property
changes: it sets it to the first value in that options array.
The final callback displays the selected value of each component.
If you change the value of the countries dcc.RadioItems
component, Dash will wait until the value of the cities component is updated
before calling the final callback. This prevents your callbacks from being
called with inconsistent state like with "America" and "Montréal".
Dash App With State
In some cases, you might have a “form”-like pattern in your
application. In such a situation, you may want to read the value
of an input component, but only when the user is finished
entering all of their information in the form rather than immediately after
it changes.
Attaching a callback to the input values directly can look like this:
from dash import Dash, dcc, html, Input, Output, callback

external_stylesheets = ["https://codepen.io/chriddyp/pen/bWLwgP.css"]

app = Dash(__name__, external_stylesheets=external_stylesheets)

app.layout = html.Div([
    dcc.Input(id="input-1", type="text", value="Montréal"),
    dcc.Input(id="input-2", type="text", value="Canada"),
    html.Div(id="number-output"),
])


@callback(
    Output("number-output", "children"),
    Input("input-1", "value"),
    Input("input-2", "value"),
)
def update_output(input1, input2):
    return f'Input 1 is "{input1}" and Input 2 is "{input2}"'


if __name__ == "__main__":
    app.run(debug=True)
In this example, the callback function is fired whenever any of the
attributes described by the Input change.
Try it for yourself by entering data in the inputs above.
State allows you to pass along extra values without
firing the callbacks. Here’s the same example as above but with the two
dcc.Input components as State
and a new button component as an Input.
from dash import Dash, dcc, html, Input, Output, State, callback

external_stylesheets = ['https://codepen.io/chriddyp/pen/bWLwgP.css']

app = Dash(__name__, external_stylesheets=external_stylesheets)

app.layout = html.Div([
    dcc.Input(id='input-1-state', type='text', value='Montréal'),
    dcc.Input(id='input-2-state', type='text', value='Canada'),
    html.Button(id='submit-button-state', n_clicks=0, children='Submit'),
    html.Div(id='output-state')
])


@callback(Output('output-state', 'children'),
              Input('submit-button-state', 'n_clicks'),
              State('input-1-state', 'value'),
              State('input-2-state', 'value'))
def update_output(n_clicks, input1, input2):
    return f'''
        The Button has been pressed {n_clicks} times,
        Input 1 is "{input1}",
        and Input 2 is "{input2}"
    '''


if __name__ == '__main__':
    app.run(debug=True)
In this example, changing text in the dcc.Input boxes won’t fire
the callback, but clicking on the button will. The current values of the
dcc.Input values are still passed into the callback even though
they don’t trigger the callback function itself.
Note that we’re triggering the callback by listening to the n_clicks property
of the html.Button component. n_clicks is a property that gets
incremented every time the component has been clicked on.
It’s available in every component in
Dash HTML Components (dash.html), but most useful with buttons.
Passing Components Into Callbacks Instead of IDs
When creating app layouts in earlier examples, we assigned IDs to components within the layout and later referenced these in callback inputs and outputs.
In the first example, there is a dcc.Input component with the id ‘my-input’ and a html.Div with the id ‘my-output’:
app.layout = html.Div([
    html.H6("Change the value in the text box to see callbacks in action!"),
    html.Div([
        "Input: ",
        dcc.Input(id='my-input', value='initial value', type='text')
    ]),
    html.Br(),
    html.Div(id='my-output'),

@callback(
    Output('my-output', 'children'),
    Input('my-input', 'value')
)
def update_output_div(input_value):
    return f'Output: {input_value}'
You can also provide components directly as inputs and outputs without adding or referencing an id. Dash autogenerates IDs for these components.
Here is the first example again. Prior to declaring the app layout, we create two components, assigning each one to a variable. We then reference these variables in the layout and pass them directly as inputs and outputs to the callback.
from dash import Dash, dcc, html, Input, Output, callback

app = Dash()

my_input = dcc.Input(value='initial value', type='text')
my_output = html.Div()

app.layout = html.Div([
    html.H6("Change the value in the text box to see callbacks in action!"),
    html.Div([
        "Input: ",
        my_input
    ]),
    html.Br(),
    my_output
])


@callback(
    Output(my_output, 'children'),
    Input(my_input, 'value')
)
def update_output_div(input_value):
    return f'Output: {input_value}'


if __name__ == '__main__':
    app.run(debug=True)
In Python 3.8 and higher, you can use the walrus operator to declare the component variables within the app layout:
app.layout = html.Div([
    html.H6("Change the value in the text box to see callbacks in action!"),
    html.Div([
        "Input: ",
        my_input := dcc.Input(value='initial value', type='text')
    ]),
    html.Br(),
    my_output := html.Div(),
])

@callback(
    Output(my_output, 'children'),
    Input(my_input, 'value')
)
def update_output_div(input_value):
    return f'Output: {input_value}'
Note: Auto component IDs won’t work with dynamic callback content unless the component variables are defined out of the callback scope. Additionally, they are not compatible with Pattern-Matching Callbacks.
Summary
We’ve covered the fundamentals of callbacks in Dash.
Dash apps are built off of a set
of simple but powerful principles: UIs that are customizable
through reactive callbacks.
Every attribute/property of a component can be modified
as the output of a callback, while a subset of the attributes (such as the value
property of dcc.Dropdown component)
are editable by the user through interacting with the page.
The next part of the Dash Fundamentals covers interactive graphing. Go to Dash Fundamentals Part 3: Interactive Graphing.